Well this is it. This is the end of this blog. It will remain here on this URL for the time being, but eventually I will move out to Codeberg, and probably use a different blogging engine.

I’m trying to remove Github stuff from my life for let’s say “ethical reasons”. Won’t speak more on the matter, it should be easy to look up.

I will eventually move to a new blog, which will hopefully be simpler and easier to maintain. I probably won’t be using Jekyll because that’s also made by Github. This blog wasn’t maintained for a while, but hopefully the new one will be. I’ll most likely post it here when it’s ready. Later!

For a long while, I wanted to refactor the Project Archive in order for Jekyll to render that page faster and to access data about my projects in other parts of the blog.

Previously, projects were merely Jekyll pages with YAML-front-end-matter (YFEM) data and page “content”. The problem with this method was that it was difficult to query what projects existed on my blog. I would previously have to loop through all posts to find out.

I wanted to move project data into Jekyll’s data files, but all project data would have to be shoved into one giant file, which I didn’t like. You also cannot render page content with data files in any easy way.

The solution to this was Jekyll’s collections feature, a very powerful alternative to data files, which allowed me to make 1 entity (here meaning a project) per file and write content for every entity as if they were pages or posts. For projects, this allowed me to make a file per project, establish project metadata (name, type, domain, etc.), and write pages about every project. For this to work, I added the following data to the _config.yml:

collections:
  projects:
    output: true
    permalink: /projects/:name/

defaults:
  - scope:
      path: ""
      type: "projects"
    values:
      layout: project
      share: true
      comments: false

Jekyll needs to know that I have a collection called projects, and every project date file will be placed in a folder called _projects (note the underscore). Also, make output equal true so that Jekyll renders pages for every project in the projects folder. In addition to this, I added some common data into defaults so that I don’t have to write those values in every YFEM of every project file.

With the project collection implemented, I refactored how projects were listed in the Project Archive by looping through them instead of posts. There were multiple loops before, now there are only 2 nested loops. I’m actually not sure if the page is rendering faster, but the code is sure easier to read now.

Now that projects have easy to access metadata, I had the liberty of enhancing the look of the Project Archive by adding a date range, header image, and posts’ domains to the project listings. The difference is like night and day. On the left side of the screenshot below is the old Project Archive, and on the right side is the new version:

Screen_Shot_2018-03-25_at_12.42.04_PM.png


Read more of this post
Chott is now avaliable on the App Store

I’m glad to announce that Chott is now available on the App Store!

In case you didn’t know, Chott is a time tracking app aiming specifically for tracking personal creative projects. I made a prototypical version of this for Android before, but this version has more features, like deleting projects and sessions.

For more information about Chott for iOS, you can check out its project page here. Or you can click the black button below to get the app. It’s free!

Download_on_the_App_Store_Badge

When making an iOS app that uses Core Data, you would usually make dummy data in the app on a Simulator and see if your data logic is working or not. But what if you wanted to test the app on another Simulator while using the data you’ve already made before? A naïve solution would be to go into the app installed in the other Simulator and recreate the dummy data. This is of course a waste of time.

A better way is to copy the Core Data database files on one Simulator and transfer them into another. That way, you can now test the app on the new Simulator without needing to recreate data.

To be able to do this, a few assumptions are made:

  • You are developing an iOS app with Xcode that utilizes Core Data
  • You already made the data model and are using the entity objects in your code
  • You opened your app in one Simulator and made all sorts of dummy data in it
  • You opened your app in another Simulator and made at least 1 piece of data that’s saved.
    • This is important, because if your Core Data app has no data, it won’t have the folders you need to drag the database files into!

For this demonstration, I have Core Data entities saved into an iPhone 8 Plus Simulator and I want to transfer them to an iPhone SE Simulator. The app being used for demonstration is called “Chott”.

Screen_Shot_2018-03-03_at_8.13.08_PM.png

Here’s how to transfer the Core Data storage from one Simulator into another:


Read more of this post

Usually, when you want an object in code to have a unique ID, a practical solution would be to use something like a GUID (or in Apple’s SDKs: a UUID). These IDs can be converted into strings for serialization purposes, but comparing the IDs as strings is probably not an optimal task.

In iOS 11, Apple allowed Core Data entities to have a new type of attribute: UUID. According to this Stack Overflow answer, the UUID will be stored as a binary when that entity is saved with Core Data, which is more optimal than using strings for storage. This can be used to give your data objects a unique identity when needed.

If you needed to fetch an object (or objects) from Core Data based off a UUID, this can now be done using NSPredicate objects, but you have to cast the UUID as CVarArg in order for the predicate code to work.


Here’s an example of what can be done:

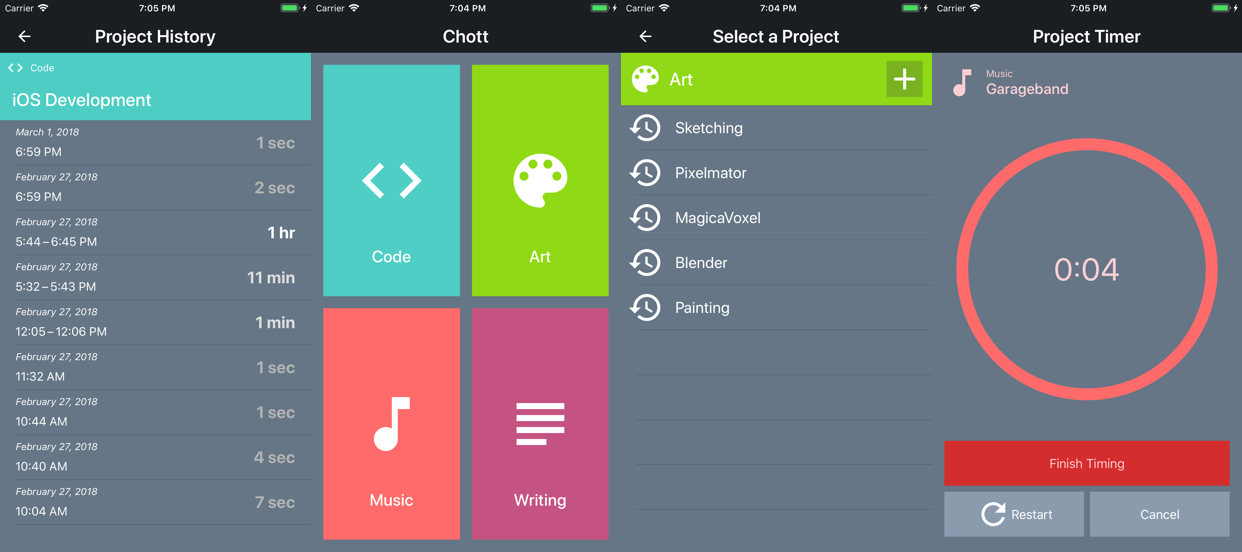
Suppose you had two entities in your iOS 11 app:

  • A Project which has a UUID (called id in code) and relevant data
  • And a Session which holds time information and the Project’s UUID (called projectId in code).

If you were given a Project object and wanted to fetch an array of Session objects matching that project’s ID, the following is a good way of doing that:

func getSessions(forProject proj: Project) -> [Session]? {
    let requestSessions: NSFetchRequest<Session> = Session.fetchRequest()

    // Make a predicate asking only for sessions of a certain "projectId"
    let query = NSPredicate(format: "%K == %@", "projectId", proj.id! as CVarArg)
    requestSessions.predicate = query

    // Perform the fetch with the predicate
    do {
        let foundEntities: [Session] = try CoreDataService.getContext().fetch(requestSessions)
        return foundEntities
    } catch {
        let fetchError = error as NSError
        debugPrint(fetchError)
    }

    return nil
}

Notice the initializer for NSPredicate takes a format string representing a query into Core Data. NSPredicate also allows for use of a Swift closure instead of a type-unsafe string for query, but quite unfortunately, Core Data will NOT take predicates that were initialized with a closure; it needs the silly formatted string.

The formatted string is simple enough. The parameter represented by "%K" is the key of the attribute you want to search for, and the "%@" is the value of the search. The key we want is Session’s attribute projectId, and we are searching for the UUID object represented in code as proj.id, but this must be casted as CVarArg or the code won’t work.

After setting the predicate and performing the fetch, it should return an array of Session objects associated with the given Project, if they exist in persistent storage of Core Data.

This code would have worked fine if UUIDs were converted to strings, but string comparison is usually slow, and this can add up if there are many instances of an entity you want to search for.

Remaking Chott for iOS

A couple of years ago, I was learning Android development in graduate school, and as a final project, I wanted to make a time tracking app for personal hobbies, which came to fruition as Chott. Now that I’m learning iOS development, I wanted to remake this app for iPhones.

I’m using Core Data as the local storage solution. I’ve use a tiny bit before, but now I’m using a new feature that allows Core Data entries to have UUIDs as a attribute. (UUIDs are like GUIDs in other languages.) Unfortunately, this feature has forced me to target the app at iOS 11 (the latest version at the time of this writing). I wanted to support to iOS 10, but I wanted to use the new UUID attributes, because I felt it would be faster than storing strings IDs.

I developed the UI of this app to look almost identical to the original Android version. I would have liked it to be on iPads, but I had a little dilemma: I wanted the iPhone version to be only in portrait orientation, while somehow allowing any orientation on the iPad. I currently didn’t know how to do this. And also, since Chott currently doesn’t have cloud sync support, I figured that it would be good for now to just target iPhones and not iPads.

I’m ready to submit to the App Store soon. If you want to find out more about Chott for iOS, check out it’s project page here for a list of features and screenshots.

Making an alarm clock app for iOS

After learning iOS development from Devslopes, I figured that I should start making apps myself as a learning experience. I wanted to start off with something relatively simple, like an alarm clock.

I already use an alarm clock app, so I utilized it as a reference to make this new app. I wanted a dimmable clock face that works on different orientations and different screen sizes. The idea was to make an alarm clock app that can also serve as a bedside clock (which is what I do at the moment).

I call this app Minapps Alarm Clock. The “Minapps” is just short for “minimal apps”, because I wanted it to be relatively simple in functionality. If I make more simple apps, I intend to attach the “Minapps” name to them.

I’m a little surprised how long it took to develop this alarm clock (about two weeks), but I fortunately learned some new nuances of iOS development. Here’s a list of skills I gained from making this app:

  • How make multiple text labels scale properly on iPad and iPhone screens.
  • How to schedule functionality with the Timer class.
  • Wrangling with the difficult Date class.
  • Reading the UIDevice class in order to disable auto-lock and to read the device battery life.
  • Using UserNotifications to send local notifications to a user when their alarms ring outside of the app.
  • Using a Settings Bundle to tweak the alarm clock settings.

I’m happy to say that Minapps Alarm Clock is available on the App Store.

Download_on_the_App_Store_Badge

If there are any bugs, open a new Github issue here.

Lately, I was learning mobile app development on iOS platforms. Since I always use an iPhone (and sometimes an iPad), I figured that I should be able to write software for these things.

I was actually exposed to iOS development before, in the distant past. Back then, it was very difficult and confusing, but I must admit that my programming skills were not as sharp back then either.

But now I finished learning the basics of iOS development from the DevSlopes team on Udemy. If you like being self-directed in your learning but want some guidance, DevSlopes is great for that.

Last month, I completed their iOS 11 & Swift 4 course. You can see my Certificate of Completion here.

At DevSlopes, you code several projects, learning the different aspects of the iOS platform. The following is a select list of such projects I uploaded onto GitHub. You can see screenshots and more information there:

  • RetroCalc: A simple iOS calculator app
  • Ramp Up: An iOS ARKit demo featuring live-sized skateboard ramps
  • Rainy Shine: A very simple weather app for iOS with 5-day forecast
  • Goal Post: An iOS app demo utilizing Core Data to try to track new goals
  • Bot Vision: An iOS machine learning demo (using CoreML) where the app tries to recognize everyday objects
  • Pixel City: An iOS app demo were users can browse Flickr photos based off map locations
  • Breakpoint: A micro social networking iOS app demo aimed for coders and other geeks, powered by Firebase
  • Confaby: An iOS Slack clone demo app that features realtime chat messaging
  • Scribe: An iOS app demo that dictates a pre-recorded voice message

I’m glad to announce that Gyra is now available on the App Store! I personally tested iOS builds on an iPhone 6 and an iPad Pro 9.7” with no problems.

If you are new here, you can read more about Gyra here and try desktop versions of the game for Windows, macOS, and Linux.

This is officially my first game (or app for that matter) on the App Store, so it certainly feels like an achievement to see one of my works on such a notable platform. Gyra is available for free, and also free of ads and in-app purchases, so please try it out.

Download_on_the_App_Store_Badge

Hope you have fun!

Submitting to the App Store is a pretty hefty task. While submitting Gyra, I sort of documented as much of the process as I could. This is not by any means comprehensive, as I omit a lot of details about iTunes Connect. However, I hope that this will still be sort of a helpful guide in submitting Unity games to the App Store.

This guide presumes that you already exported your game to iOS from Unity’s Build Settings. This creates an Xcode project you may have to tinker with later. You must also be subscribed to the Apple Developer Program (which is $99 a year for individuals).


Make A Distribution Certificate

Certificates are used by Apple to sign your app, thus identifying you as the developer. Certificates are tied to a computer and there are multiple kinds (like for development and for distribution). The following procedure is for getting a certificate to submit to the App Store:


Read more of this post
Building Gyra for iOS

Lately, I’ve been learning iOS development in order to increase my skills. I’ve gotten pretty comfortable with Xcode 9 and Swift 4, and I even have a some idea of how submitting to the App Store works (although it’s still pretty complicated).

I soon realized that I might be able to submit something I already made to the App Store. So lately, I’ve been looking over Gyra and trying to make it suitable for submission. My reason for choosing Gyra is because it’s relatively polished, and was already made mobile-friendly. The game was made 2 years ago for Ludum Dare, but because it’s simple, I felt this would be a good project to get onto the App Store.

I only needed to do a few tweaks to Gyra before it would be ready for submission. Firstly, I made the game UI larger, so that it would look good on mobile devices. I did some tests on an iPhone 6 and an iPad Pro 9.7”, and found the original UI too small. Currently, I’m not sure how anyone would factor scaling of in-game UI to different screen sizes (like mobile vs. desktop for example).

I provided app icons and splash screens for Unity’s Player Settings, but long story short, there are some issues with stretching and quality of icons and splashes (using Unity 2017.2 at the moment).


Read more of this post

» Play Caelium Alpha Here «

Caelium Alpha was something that I always wanted to make, interactive software for making imaginary solar systems. I think this was my more favorite Ludum Dare event yet. I made something decently playable within the 72 hours, but also made a Post-LD build that has more features and bug fixes.

I really appreciate all the people who played the game and gave feedback! The feedback will help me greatly in determining what features to add to the game and what should be fixed. I intend to keep making this after the event’s over, but it will have to progress very slowly.

What Went Well

  • I’m happy with the complex object hierarchy that allows each of the planets to orbit around the star with different orbit speeds and rotations. It can even support tilt (like the planet Uranus), but this was an experimental feature that was not released as of yet.
  • The UI could always improve, but I don’t use Unity’s UI features that much, so having the changeable UI with sliders feels like an accomplishment.
  • Planet selection with the mouse. Doesn’t sound like a big deal, but it’s fundamental in order for this game to work.
  • The particle effects help with depth perception and adds visual cues to the game.
  • Got great feedback from the Ludum Dare community. Thanks again!
  • Object-based data system that allows stars, planets, and moons to have adjustable properties that they all have in common while also having unique features.
  • Decoupling between a planet’s data and the scripts controlling the properties of a planet.
  • (In the Post-LD Version) My implementation of auto-padding between planets allow planets to change size or have additional moons without other planets colliding them.
  • (In the Post-LD Version) Being able to use a musical piece from Stephen Tanksley. Adds nice atmosphere to the game!

Read more of this post

I am happy to announce that the Post-LD Edition of Caelium Alpha is now avaliable on Itch.io. Last post, I mentioned about a bug where planets would clone multiple times. Fortunately, that bug was fixed, and I also added the ability to add moons, which wasn’t supported in the original Ludum Dare entry.

The Post-LD Edition also features a soundtrack from the composer Stephen Tanksley (great music for modern games) and sound effects from Glitchmachines. Audio really does make a big difference!

If you are interested in reading more about the original Ludum Dare version of Caelium Alpha, you can read about it on its Ludum Dare page.

On the previous weekend was the 38th Ludum Dare game jam, which has now been going on for 15 years. This time around, the theme was “A Small World”. As I thought about how to design a game around a small world, I remembered a project that I always wanted to do.

A little history first, I always wanted to make a “game” involving building your own solar system (or planetary system, which is the general term). It would always be more of a sandbox, akin to Minecraft or SimCity. I’ve called this game idea Caelium (which originates from a word “caelum” for “sky or heavens”). I’ve wanted to make a serious prototype of this game, but for various reasons I couldn’t (life, college, grad school, etc.)

So concerning the game jam theme, I figured that I could probably make Caelium resemble “a small world” by trying to imitate an orrery, which is a model of the solar system. By participating in this game jam, I finally made serious progress with this idea. Since it’s still early, I called the game Caelium Alpha.

Unfortunately, the current version of the game has a strange bug where multiple planets spawn when trying to spawn one planet. This was due to a prefab reference problem in Unity I mentioned in another post. I intend to make an improved version of Caelium Alpha that fixes this problem and also add the ability to spawn moons (which is currently not supported).

If you want to try out the game prototype, you can go to the game’s Ludum Dare page, or the game’s Itch.io page.

In Unity, I wanted to set up a situation where there is a prefab, and it contains a script, and that script references back to the prefab. The reason for this strange setup was because, once cloned, that GameObject can keep cloning itself as instructed by the script.

When I started cloning this prefab, I discovered that mutiple objects started popping up (instead of one). I tried breakpoints and logging messages, but I couldn’t figure out why many clones were popping up from one invocation.

I eventually went into the object hierarchy and found that the root prefab clone had a very important GameObject reference mysteriously changed. The original prefab would have this reference pointing to itself, but when cloned in the scene, the clone would no longer point to the original prefab, but instead to the clone itself, automagically!

After a ton of searching, I found a discussion on the Unity Forums pertaining to this problem. It was here that I found out that any prefab that references itself and then get cloned, the clone will reference itself, not the original prefab.

I frankly consider this unexpected/undesireable behavior, but on the forum thread, someone from Unity said that it was by design. Perhaps I can understand that the underlying implementation of Unity is complex, and they had to make decisions that can look strange to an outsider. But I still would consider this to be a bug, because it cost me a ton to time to fix this issue. I was working on a game called Caelium Alpha when I encountered this problem, which happened around the last 2 hours. I was not able to fix it before time was up.

So the moral of the story is that you should never have a prefab that references itself in its own scripts. It can cost you your development time!


If you are curious to know a workaround, personally I just resorted to loading the prefab from a Resources folder in the Unity project, and loading the prefab with Resources.Load(). This is actually not my prefered way to solve a problem like this, but I decided to go for it, because there was only 1 prefab I wanted to clone, not a hundred different prefabs.

Since moving to Jekyll and GitHub Pages, I wanted a way to write a new blog post from a mobile device. I admit that I might not write from a mobile device very often, but it’s nice feature to have, and Wordpress.com has an app to make this task easier.

I searched long and hard for ways to write posts on an iOS device and post them to this blog. Long story short, I found a way from hardscrabble that involves using an app called Editorial. It’s a pretty advanced text writing app that has tons of features like templates and custom workflows. Instruction provided by hardscrabble show how to set up the app to write to your Jekyll-powered blog (if it’s hosted on GitHub Pages). The custom workflow hardscrabble made can be found here. I did a few tiny tweaks, but it works perfectly.

This post was written in and sent from the Editorial app.

At DePaul University, typical coding projects take about 3 months to complete. However, if you are assigned to make a game engine, it can take 9 months! (That’s 3 quarter terms at DePaul).

LGE is the result of a long-term sequence of game engine development courses where students are tasked with making a game engine. You start with graphics and math, but then build up many other systems like run-time formats, hierarchy trees, and even skinned animation, on the GPU! You take the same engine you made the previous course and keep developing it.

Let’s just say it wasn’t a walk in the park.

But it’s definitely the most advanced code I’ve written yet. It may be useable for a simple animated game (although LGE doesn’t have an audio system).

You can learn more about the LGE game engine at the project’s page, or download the code from GitHub.

In interactive media (ie. video games), procedural generation is gaining momentum, and I think it’s a really cool concept; making computers do the art (or level design).

Another thing I think is cool is outer space, especially planets. The best of both worlds collided back in the early 2010’s with an old iPad app called Planetary. It made very good use of procedural generation techniques to make life-like planets on the screen. Unfortunately that app doesn’t exist anymore (although the source code is available).

That app inspired me to try to make procedurally generated planets. I found an opportunity to do so as a grad school research project. The result is the library Procedutex, which can procedurally generate textures of many kinds, although I mostly used it to demonstrate planetary textures.

You can read more about it at the project’s page, or you can get the source directly from GitHub (code is Windows only).

Through the last couple of years, I’ve been making a few software systems in C++ (mostly game code for grad school). But all of that C++ code was always written for the Windows platform.

I really wanted to know what it would be like to write C++ game code on a Mac (since I use Macs quite a bit). I must admit, it wasn’t easy, since Xcode thinks you only want to write C++ for non-visual command line stuff (and not something visual like a game).

I looked long and hard for a way to make a GUI project in C++ on Xcode. It seems that you have to make a Cocoa Application and use Objective-C as the language. That seems counter-intuitive, but since the main() function is mostly C-style, you can remove the Objective-C code, rename the file main.mm, and use a 3rd party GUI library like GLFW to launch a window with OpenGL context.

From there, you can make an OpenGL-powered game engine in C++ that runs on Macs. I did exactly that with an engine I call Sea2D (Sprite Engine Apple 2D). You can go the project’s page to find out more, or you can get the source code directly from Github.

One of the hardest classes in grad school was a class where you make Space Invaders. You would think that would be easy, but it was actually very difficult (although rewarding in the end). From basically nothing (other than a barebones OpenGL graphics API written for C#), students were to recreate the famous game Space Invaders.

You can read more about that at the project’s page, and get the source code from there too (Windows only).